Use slideshows sparingly! A slideshow displays content one item at a time within a single page area. Because learners must interact with the slideshow to view additional slides, much of the content is initially hidden from view.
Use a slideshow when:
- There is a pedagogical purpose that supports the learning experience.
- Learners benefit from viewing content in a specific sequence.
- You are guiding learners through a process, walkthrough, or analysis.
- Focusing on one example at a time supports the learning objective.
Avoid using a slideshow when:
- The primary goal is to reduce page length.
- All examples or images are equally important.
- Learners need to compare, scan, or quickly revisit content.
Add a slideshow
- Put your cursor where you want to add a slideshow.
- Select the Insert Media icon
 .
. - Select the Insert Slideshow icon

Update the Accessibility Labels. Edit the pieces in ALL CAPS.
- Title: This is read by a screen reader and introduces the slideshow. It should be descriptive.
- Description: This provides an opportunity to include additional description. The text in ALL CAPS can be edited or deleted. The last sentence must remain as it tells the screen reader user how the slideshow works.
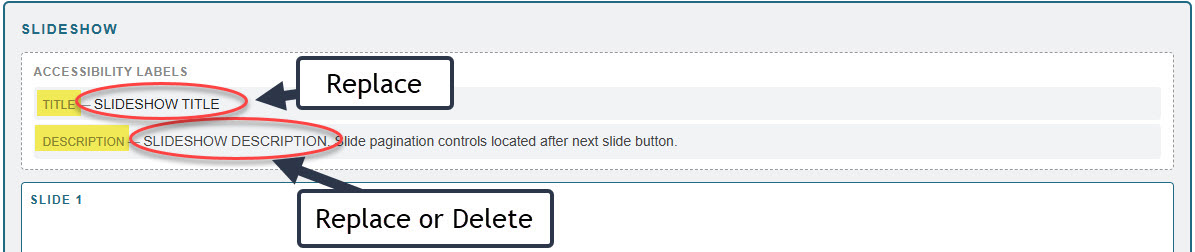
- Put your cursor in Slide 1.
- You can add the following elements using the CKEditor.
- One Heading
- Simple images with alt, caption, and credit
- Additional text
- Links
- You should not add the following items
We want to avoid putting complex information in a slideshow. Once you put an interactive or complex element inside another interactive element (ie. the slideshow), it becomes very confusing when being read by assistive technology.- Videos
- Complex images that require a long text description.
- Accordions
- Templates: The template button looks like it works, but it will not actually add the template
- Math
IMPORTANT REMINDER: Use Ctrl+ Shift + V when pasting content.
Other tools
- Accessibility Info (lower left corner) provides a pop up that explains the reading order.
In all cases, it reads the slide in this order (heading > image (alt) > caption > credit > additional text).
NOTE that all the headings will read together so do not use headings within the text to chunk content. If the content on a slide is long enough to warrant multiple headings, it probably should not be in a slideshow.
This pop up tells you exactly how each individual slide will read. - Ability to move a slide up or down
- Ability to add a new slide below
- Ability to duplicate a slide
- Ability to delete a slide

Getting help
Your Learning Designer is both a pedagogical expert and a technical resource, including support with Drupal. They can help you determine if a slideshow is a good solution for your learning goals. Contact them any time for guidance throughout course development.