Editing Course Content at Dutton
Editing Course Content at Dutton mjg8Basic Functions
Basic Functions jls164Log In
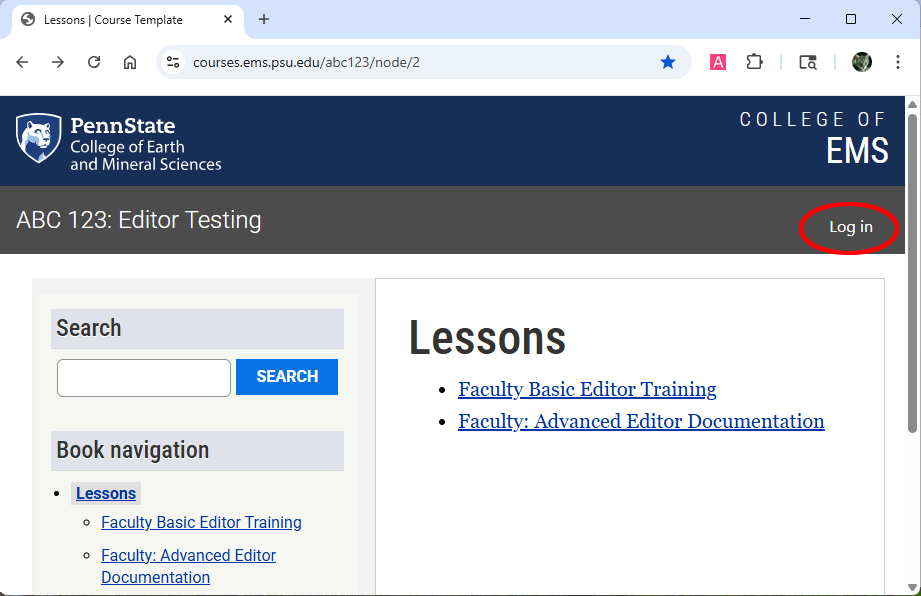
- Click the “Log in” link in the top right of the course.
- Log in with your Penn State credentials.
Edit
- At the top of any content page, click Edit
 . The page content will open in the text editor (CKEditor 5).
 - Edit or enter content in the Body window using the toolbar provided.
- The Create new revision toggle
 should always be "on“ (green).
 - If you do not see the Create new revision toggle, click the Show Sidebar panel icon
 .
. - Use Full screen mode
 to expand the CKEditor window to fill the monitor for easier editing.
 - To return to normal view and to save your edits, exit Full Screen mode by clicking on the Full screen icon again.
Save

- To save your work while editing, use Save and Edit (three vertical dots next to Preview)
 . We recommend doing this frequently!
 - To save your work and exit the editor, use Save
 .
. - Use Preview
 to review your work before saving.
 - To exit a page without saving your changes, select View
 .
.
Add lessons and pages
Adding lessons and pages is easy!
Add a new lesson
- Navigate to the course Home Page.
- Scroll to the bottom of the page.
- Select Add child page to create a new lesson.
- Add the lesson title in the Title box and the lesson introduction in the Body section.
- To save your work and exit, use Save .
Add a new book page to a lesson
- Go to the top level of the lesson for which you want the new page.
- Scroll to the bottom of the page.
- Select Add child page to insert a Book Page within the lesson structure.
- Add the page title in the Title box and the page content in the Body section.
- To save your work and exit, use Save .
NOTE: The new page will likely appear in the middle of the lesson. Rearranging pages in Drupal 10 is complex - see your learning designer for assistance with moving the new book page.
Add a basic page, a DataCamp page, or an H5P page
To add a page:
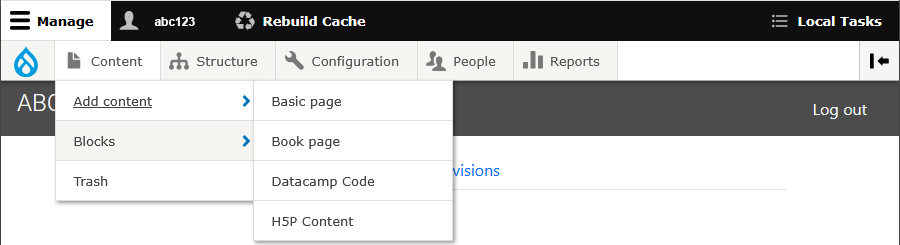
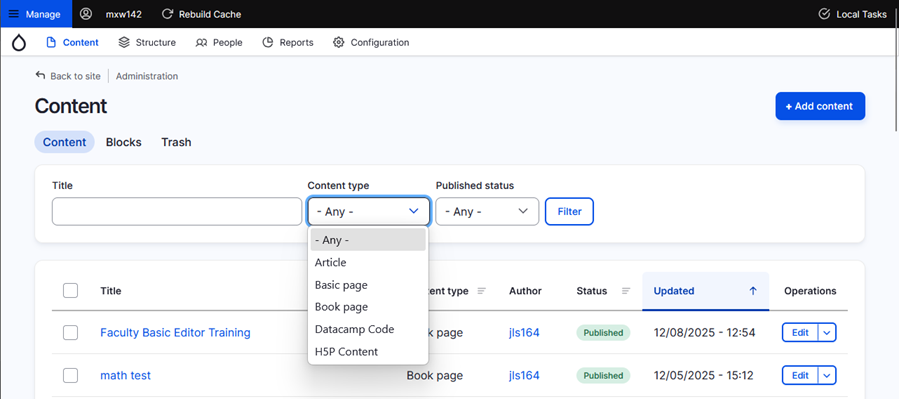
- Click Manage in the upper-left black menu bar.
- Select Content.
- Click Add content.
- Choose the appropriate content type from the list:
- A Basic page does not appear in the navigation. It should only be used in consultation with your learning designer.
- A Book page appears in the navigation.
- Datacamp allows users to embed interactive R and Python code editors directly into their content. Please work closely with your learning designer to create these elements.
- H5P Content is interactive content you can embed on pages. It should only be used in consultation with your learning designer.
Hide/unpublish pages
Hidden pages remain in the navigation with a strikethrough that only editors can see. A hidden page is searchable by editors but not by site visitors (e.g., students).
When viewing a hidden page, editors will see a yellow banner at the top that says, “This content is currently hidden and not displayed to certain user roles.”

To hide content:
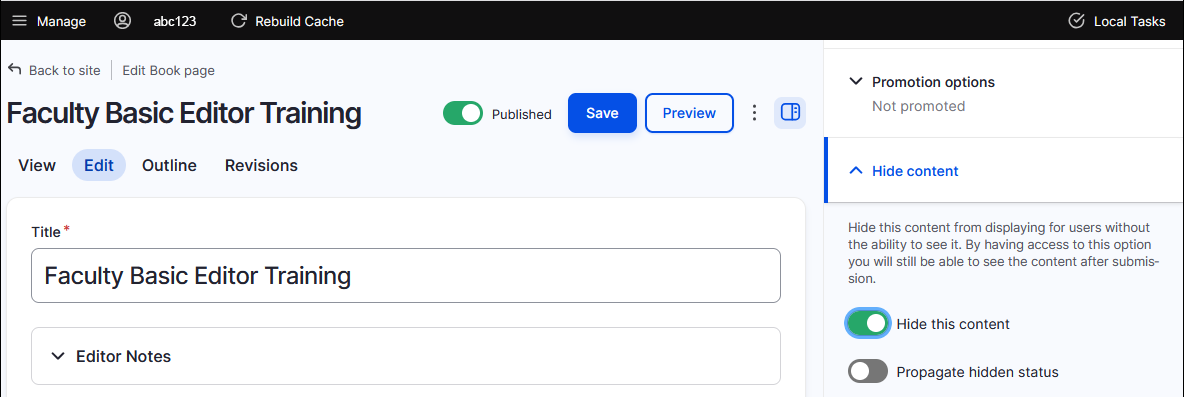
- Edit the page.
- Open the Hide content section in the right-hand navigation. If the sidebar isn’t open, click the Show sidebar panel icon in the upper right.
- Toggle Hide this content to on (green) to hide the page.
- To hide all associated child pages, toggle Propagate hidden status after hiding the top-level page.
Best Practices (hide/unpublish)
Hide
- Use hidden pages sparingly. Drupal 10 is not intended to serve as a content repository. Your learning designer can help you store unused content safely in another location.
- You should propagate the hidden status of child pages when applicable. If not propagated, child pages will not be visible to visitors but will appear unhidden to editors, creating a false sense of the lesson navigation. They will also be searchable.
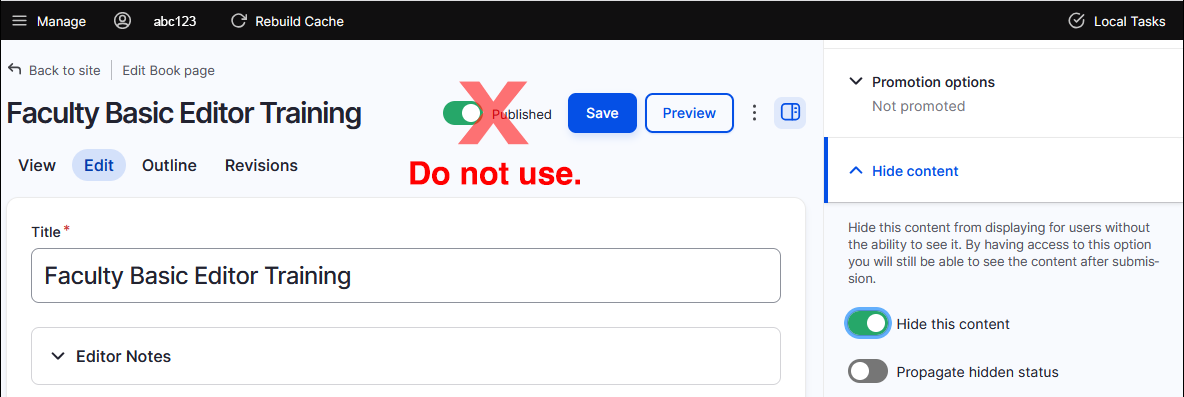
Unpublish (do not use!)
Do NOT use Unpublish! It does not work. Students will still be able to see unpublished content.
View, sort, and filter a list of content
To view and sort a list of all the content:
- Click Manage and select Content in the resulting horizontal menu to view and sort a list of all the content, including page title, original page author, the status, and when it was last updated.
- Filter the content by content type (Book Page, Basic Page, Datacamp Code, and H5P Content).
- Click on the page title to go directly to that page.
- Click the edit button on the right to open the edit window from this view.
Revisions: Review and revert to a previous version
Use the Revisions tab  at the top of the page to view a chronological list of page revisions. The list includes the date and time the page was updated and the USERID of the person who made the edit. You can compare versions and restore previous versions.
- Click on the date to see what the page looked like at that time. Use the back button to return to the current revision.
- Click on two dates to compare the revisions over time. To do so, select a Source revision and a Target revision and click the Compare selected revisions button
 on the left side of the page.
 - Click Revert next to the version you want to restore.
Important Note
The create new revision button should ALWAYS be toggled ON for this to work as designed.
URL aliases (do not use!)
Please DO NOT USE a URL alias. They interfere with lesson ordering and use of the LTI.
Getting help
Your learning designer is your partner in building effective and engaging online courses. Whether it’s navigating Drupal or refining your content, we’re here to assist. Please don’t hesitate to contact us with questions.
Content Formatting: Structure and Layout
Content Formatting: Structure and Layout jls164On this page, we'll talk about the tools available to help structure a page.
Text Alignment and increase/decrease indent
Use Align Text  , Indent
  and Outdent
  to apply formatting as expected.
The Justified  and Center-aligned
  text formats are inaccessible and should not be used.
Horizontal Rule
The Horizontal Rule  button can be used to visually separate content sections by inserting a horizontal line into the page. Use these sparingly and never in place of headings.
Headings
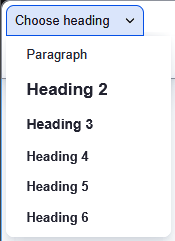
The Heading dropdown menu allows you to add headings to your content. Headings provide a clear structure that helps readers quickly scan content and improve accessibility for screen readers. Use the heading drop-down (see below) to select the desired heading as follows:
- Start the page content with H2
- Follow a logical hierarchy: Title, H2 (major sections), H3 (subsections), etc.
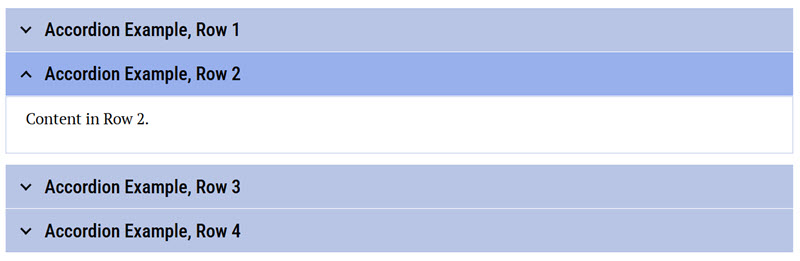
Accordions
Accordions  are used to save space, reduce scrolling, improve page scannability, and make interfaces less overwhelming. Unfortunately, they also essentially 'hide' content from students and make the content unsearchable unless the row is open, so accordions should be used strategically and sparingly. If you would like to use an accordion, contact your learning designer to set it up. They will make sure it meets current federal accessibility requirements and follows pedagogical best practices. Once the accordion has been created, you will be able to edit it as needed.
To edit an Accordion,
- Place your cursor in the Row Title or Row Content.
- Edit the field contents as you normally would using the editor.
- Add or delete a row, click in the text field, and select Insert row above, Insert row below, or Delete row from the pop-up window.

Note: The pop-up window appears at the top of the accordion, not the row where your cursor is. You need to click the title or row where you want to add or delete, scroll to the top or bottom of the accordion, and make your selection.
Lists
Use the Bulleted List button  and Numbered List button
  in the toolbar rather than using numbers and letters from the keyboard. Using the buttons ensures accessibility for screen readers – and it’s much easier to do.
Blockquote
Use Blockquote  for true quotations only. Do not use Blockquote to add emphasis or for formatting reasons. Talk to your learning designer about accessible and responsive options for adding emphasis, like a text box.
Getting help
Your learning designer is your partner in building effective and engaging online courses. Whether it’s navigating Drupal or refining your content, we’re here to assist. Please don’t hesitate to contact us with questions.
Content Formatting: Text Styling
Content Formatting: Text Styling jls164Bold, italics, strikethrough
Use Bold  , Italics
  , and Strikethrough
  to apply formatting as expected.
Best Practices
- Use all three of these sparingly for emphasis. The intended emphasis does not translate when using screen readers.
- Avoid using Strikethrough unless you are showing corrections.
- The Clear Format tool
 is context-sensitive and lets you remove the formatting for bold, italics, strikethrough, superscript, and subscript.
 - Keep italics brief. Long sections of italicized text can be difficult for some students to read.
Superscript, subscripts, and special characters
Use Superscript  , Subscript
  , and Special Characters
  buttons to apply formatting as expected.
With the Special Characters tool, you can insert many common characters, including currency, arrows, and math, without special code. For example, ½, ¾, and ∑. Please use these characters to create simple equations.
Highlight text and change text color
The Highlight icon is used to highlight text, change text color, or remove existing highlighting or color from text.
- Highlight colors
 : yellow, green, pink, and blue. These colors have been tested for accessible color contrast.
 - Text colors
 : red and green. These colors have been tested for accessible color contrast on a white background. If you have any questions about contrast, consult with your Learning Designer.
 - Use the eraser icon
 to remove the highlight or text color.
Best Practices
- Use font color and highlighting sparingly, and with a clear and consistent purpose.
- Do not rely on color alone to convey meaning. Remember, a screen reader will not announce a color change to a student. If color is necessary, talk to your learning designer to ensure it is accessible.
- The clear format tool is context-sensitive and lets you remove formatting for bold, italic, strike-through, superscript, and subscript.
- The remove format tool is context-sensitive and lets you remove highlight colors and text colors.
Getting help
Your learning designer is your partner in building effective and engaging online courses. Whether it’s navigating Drupal or refining your content, we’re here to assist. Please don’t hesitate to contact us with questions.
Tables
Tables jls164Tables are difficult to make accessible and responsive. To ensure your course meets current federal accessibility requirements and follows pedagogical best practices, the learning design team will add tables for you. If you wish to add a new table, please provide your learning designer with the table in an alternative format (such as a Word document or Excel file). Once a table is added, you can edit it.
To edit the content of an existing table cell, click the cell and edit.
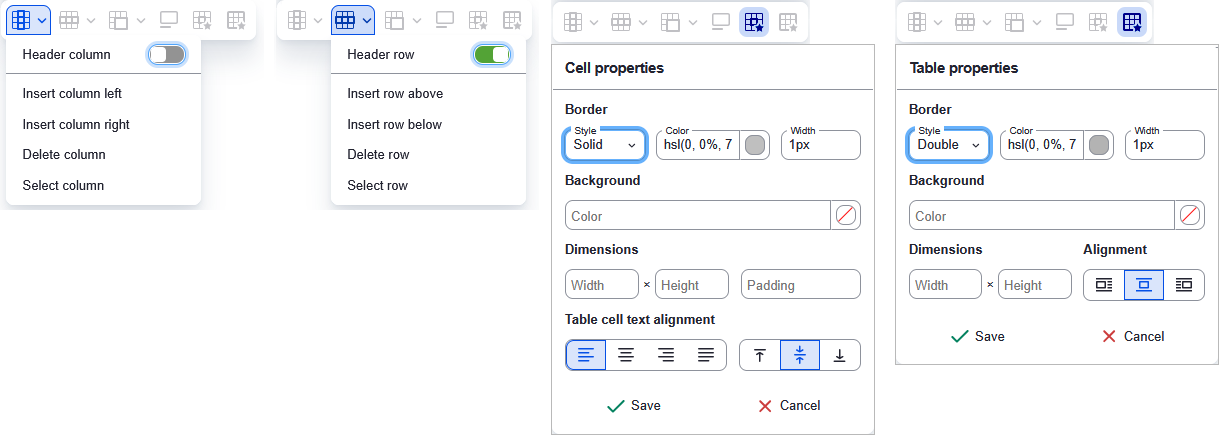
To add or delete rows or adjust table properties, click anywhere on the table to open the floating toolbar.
The floating toolbar lets you:

 Add or delete columns and set column headers.
- Set the required header columns by switching the toggle to On (green). See the images below.
 Add or delete rows and set row headers.
- Set the required header rows by switching the toggle to On (green). See the images below.
 Merge and split cells.
- Due to accessibility concerns, please do not merge or split cells.
 Add the required table caption.
- Click on the caption button to toggle the caption on and off.
- The table caption should always be ON.
- Always include a table caption. Captions explain the purpose of the table and are a required accessibility standard.
- Click on the caption button
 Adjust cell properties, such as alignment.
- For accessibility reasons, please do not adjust the borders or background colors. The course theme controls table styling to ensure readability, contrast, and mobile compatibility. If there is a compelling reason to change these, contact your learning designer to ensure they are accessible.
 Adjust table properties, such as alignment.
- For accessibility reasons, please do not adjust the border, background color, width, or styling. If there is a compelling reason to change these, please work with your learning designer to ensure they are accessible.
The following screen captures show some of the options available in the floating toolbar.
Getting help
Your learning designer is your partner in building effective and engaging online courses. Whether it’s navigating Drupal or refining your content, we’re here to assist. Please don’t hesitate to contact us with questions.
Links, Images, and Video
Links, Images, and Video jls164Links
To add a link, highlight the text you want to link, click the Link icon  , add the URL, and choose the green Insert button.
- Use relative links when linking to pages within the same course. (A relative link specifies the location of a target relative to the address of the page where it is situated.)
- Use the following relative link format: ../node/###
- Use absolute links for links to external resources. An absolute link includes the entire URL: https://www.google.com/
- Avoid linking directly to content in other courses. Linking to other courses creates unnecessary dependencies that you can't control. Instead:
- Recreate the content in the current course and give credit to the course author, or
- Link to public resources like the sample syllabus, ROAM, or the Geospatial website.
- Do not link images or graphics. Drupal will strip them out to maintain accessibility and semantic correctness. Instead, put the link in the image caption.
Images
To ensure all courses meet current federal accessibility requirements and follow pedagogical best practices, only the learning design team can add images. Do NOT copy and paste images directly into the editor. In many cases, this breaks the page, and you can no longer edit it.
To include an image, please provide your learning designer with:
- The image file. The image should be the largest size and resolution available and should not be embedded in Word or PowerPoint.
- A caption.
- For complex images, include the key details students must understand.
- The caption appears directly below the image
- A complete credit, including author, title, URL, date accessed, and license information (if known).
- The desired placement on the page.
- Accessibility requirements. Providing accessible images is more of an art than a science. The requirements are listed below, but we strongly recommend discussing with your learning designer before attempting this on your own. They can provide guidance and tools to help.
- An alt tag (short description for screen readers)
- Be descriptive: Describe what the image shows, not just its type
- Be concise: 120 to 140 characters is ideal
- Be relevant to the purpose of the image
- Avoid redundancy: Don't repeat information that's already in the surrounding text or caption
- Help: Get help with alt-tags:
- Your learning designer is a great resource!
- Poet Image Description. This site describes when and how to describe images and offers an opportunity to practice.
- Image Accessibility Creator. An AI-based accessible image generator from the Arizona State University.
- IST Image Accessibility Assistant. An AI-based tool that creates alt-text and descriptions for images, from IST at Penn State.
- A long text description for complex images.
- Your learning designer can provide guidance and tools to help you draft effective alt tags and text descriptions.
- The long description will appear on the webpage as a toggler below the image. A toggler is an expandable button that students can click to reveal additional content.
- When expanded, the full long text description becomes visible.
- When collapsed, it remains hidden.
- An alt tag (short description for screen readers)
Consider Color Contrast when using or creating images.
Color contrast affects usability and accessibility for learners, especially learners with low vision or colorblindness. To help ensure compliance with federal guidelines:
- Consult with our learning designers or multimedia specialists before creating your own charts, diagrams, or graphics.
- Avoid investing significant time in visuals until we've confirmed they meet accessibility standards.
- We may reach out if existing images or graphics need adjustments to meet required contrast levels.
We're here to guide you so materials remain both accessible and instructionally effective.
Videos
To ensure all courses meet current federal accessibility requirements and follow pedagogical best practices, only a learning design team member should embed videos in course pages.
To include a video, provide your learning designer with:
- A link to the video, or the embed code (if available).
- A caption for the video.
- A complete credit (author/creator, title, URL, date accessed, and license information, if known).
- The desired placement on the page.
Your learning designer can assist with uploading, captioning, and ensuring the video meets accessibility standards. For reference, the DOJ requires that all videos be captioned with at least 99% accuracy. Dutton also requires a transcript for any video not hosted in Kaltura.
Getting help
Your learning designer is your partner in building effective and engaging online courses. Whether it’s navigating Drupal or refining your content, we’re here to assist. Please don’t hesitate to contact us with questions.
Math: Creating Equations
Math: Creating Equations jls164What you need to know first
- Do not use LaTeX. LaTeX will break pages in Drupal 10.
- Do not use images of math. Images of equations are not accessible and violate WCAG requirements.
- Use built-in tools only. Math in Drupal 10 must be created using MathType (for inline equations) or MathML (for block equations).
- Math using block equations will not render in edit mode. You must save the page to see the rendered equation. When editing later, you will see the code again—this is normal.
Add inline equations
Use inline equations when math appears within a sentence.
- Place your cursor where the equation should appear.
- Select the Insert a math equation button (
 ) in the toolbar.
 - Build the equation in the MathType window.

There are three ways to use the MathType Editor- Use the tabs to find the correct math symbols, functions, and characters, and select them as you build the equation.
- Copy and paste MathML directly into the MathType window.
- Hand-draw the equation by clicking on the
 icon on the right side of the MathType window. In the lower-right portion of the MathType window, you will see what your resulting equation will look like when presented on the webpage.
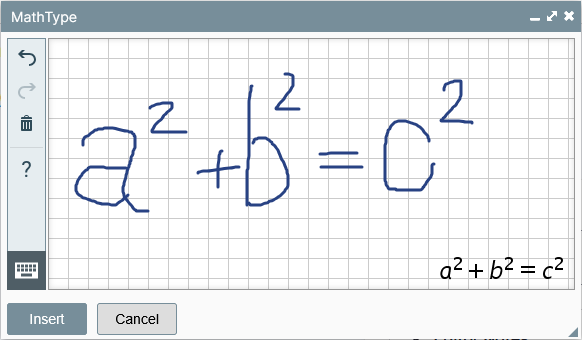
- Click Insert to add the equation to the page.
- Save the page.
Add free‑standing block equations
Use block equations when math:
- Appears between paragraphs
- Needs emphasis or spacing
- Requires an equation number
Example of a free-standing equation
Steps
- Place your cursor where you want to add an equation, typically between paragraphs.
- Open Templates dropdown menu (
 ) and select MathML and Figure Number (
  ).
). - Double-click on the math equation a2+b2= c2 to open the MathType window.
- Edit/create your new equation in the MathType window.
- Click the Insert button when you have completed your equation.
- Update or remove the EQUATION_NUMBER that appears on the right side of the math-box-container window.
- Replace it with a number according to the course style guide.
- Double‑click and delete twice to remove the equation number.
- Save the page.
Note: If you are looking at this on a mobile-sized screen, the equation number will appear below the equation, not to the right.
Using external tools to create MathML
There are several tools you can use to create MathML code for equations, including Equatio (Mac and PC) and MathType (PC only). Contact your learning designer if you would like help learning how to use either of these tools.
Checking equation accessibility accuracy with speech text
There are two ways to check your equation and make sure it is accurately presented to those who use screen readers.
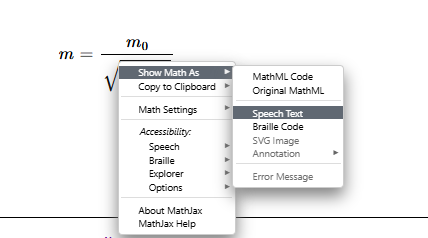
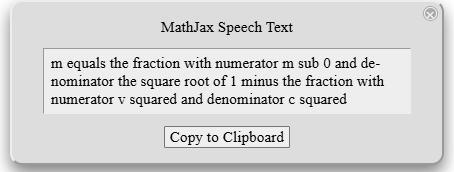
- Use Speech text
The speech text option will display what will be read by a screen reader when the equation is in focus. This allows you to verify that the numerators and denominators, exponents and subscripts, etc., are correct.- Go to the webpage that contains your equation. Do not select edit.
- Right-click on the equation.
- Hover over Show Math As
- Select Speech Text
- Install and use a screen reader to view your course webpage. The learning design team can help you get started with a screen reader.
Editing an equation
Editing the MathML code for complicated block equations can be difficult. The design team is available to assist as needed. If you do not have time to wait for the designer, the best option is to recreate the equation from scratch using the math equation () tool.
Getting help
Ask your Learning Designer if:
- The equation is long or complex
- You need aligned or multi‑line equations
- You are unsure whether symbols are accessible
Your Learning Designer is your resource for both pedagogy and technical support, including Drupal. Contact them anytime for guidance on creating effective and accessible learning experiences.
Math Complexities and Troubleshooting
Math Complexities and Troubleshooting jls164This section is for complex equations, troubleshooting, and advanced workflows. Faculty are encouraged to involve a Learning Designer when working with these scenarios.
Using the correct mathematical symbols
Warning!
Some keyboard characters look like mathematical symbols but are not true mathematical symbols. If you use the incorrect character, your equation will not be read correctly by a screen reader.
For example
- The hyphen on your main keyboard is not the same as the minus sign on the numeric keypad.
- The dot used for multiplication is not the same as a period.
- An asterisk is not the proper symbol for multiplication.
The table below provides several ways to ensure you are using the correct symbols when writing mathematical equations. Inserting the proper symbols into your equations may require the use of dedicated tools for creating MathML code or access to the source MathML code.
NOTE: Checking and changing these symbols must be done in the source code (  ). For assistance, please contact your Learning Designer.
| Symbol | Operator | Description | Screen Reader | Named Entity (html) | Decimal | Hexadecimal | MathML Code |
|---|---|---|---|---|---|---|---|
| + | Addition | Plus sign | "Plus" | + | + | + | <mo>+</mo> |
| − | Subtraction | Minus sign (proper) | "Minus" | − | − | − | <mo>−</mo> |
| - | Hyphen (Do not use for subtraction) | Hyphen (on your keyboard) | "dash" | ‐ | - | - | <mo>-</mo> |
| × | Multiplication | Times sign | "Times" | × | × | × or × | <mo>×</mo> |
| x | x (Do not use the letter x for multiplication) | The letter x | "x" | n/a | ¸ | N | <mo>x</mo> |
| ⋅ | Dot Multiplication | Dot operator sign | "Times" | · | ⋅ | ⋅ | <mo>⋅</mo> |
| * | Asterisk (Do not use for multiplication) | "Star" | |||||
| ∗ | Asterisk for Multiplication | Asterisk times sign | "Asterisk operator" | n/a | ∗ | ∗ | <mo>∗</mo> |
| ÷ | Division | Division sign | "Divide by" | ÷ | ÷ | ÷ or ÷ | <mo>÷</mo> |
| = | Equals | Equals sign | "Equals" | = | = | = or = | <mo>=</mo> |
| ≠ | Not Equal | Not equal sign | "Not equal to" | ≠ | ≠ | ≠ | <mo>≠</mo> |
| < | Less Than | Less than sign | "Less" | < | < | < or < | <mo><</mo> |
| > | Greater Than | Greater than sign | "Greater" | > | > | > or > | <mo>></mo> |
| ≤ | Less or Equal | Less than or equal sign | "Less than or equal to" | ≤ | ≤ | ≤ | <mo>≤</mo> |
| ≥ | Greater or Equal | Greater than or equal sign | "Greater than or equal to" | ≥ | ≥ | ≥ | <mo>≥</mo> |
| ≈ | Approx Equal | Approximately equal sign | "Almost equal to" | ≈ | ≈ | ≈ | <mo>≈</mo> |
| ± | Plus-Minus | Plus-minus sign | "Plus or minus" | ± | ± | ± or ± | <mo>±</mo> |
| ∞ | Infinity | Infinity sign | "Infinity" | ∞ | ∞ | ∞ | <mo>∞</mo> |
| √ | Square Root | Square root sign | "Square root" | √ | √ | √ | <mo>√</mo> |
Alignment of mathematical equations
The last tab in the MathType editor window suggests you can align a series of equations (left, center, right, or aligned with the equal sign). Unfortunately, these alignment settings do not render correctly when saved to the page. If you need help aligning a series of equations, please contact your Learning Designer.

Cleaning up MathML
Messy MathML may include unnecessary attributes that:
- Make editing difficult
- Increase the chance of errors
Cleaning MathML improves long‑term maintainability. Learning Designers can assist, or advanced users may use AI tools to simplify MathML while preserving meaning.
Getting help
Your Learning Designer is your resource for both pedagogy and technical support, including Drupal. Contact them anytime for guidance on creating effective and accessible learning experiences.
Advanced Editor Role Overview DRAFT
Advanced Editor Role Overview DRAFT jls164The Advanced Editor role is given sparingly to help maintain consistency, accessibility, and responsiveness across all D10 courses. Faculty who receive this role complete a required one‑on‑one training and agree to follow all documented guidelines. This helps ensure that course pages remain stable, accessible to all learners, and easy for the design team to support.
Everything on this site is designed to support a shared editing experience that protects students, faculty, designers, and the long‑term maintainability of D10 courses. The Advanced Editor role allows additional capabilities, but it also brings a responsibility to work within established patterns and consult the design team whenever something falls outside the documented workflow.
What Advanced Editors Can Do
Advanced editors have access to a broader set of editing tools, including:
- Adding or editing images, videos, or tables following the documented processes
- Using templates
- Using HTML snippets when needed and when documentation supports it
- Fixing formatting issues that do not change layout or styling
- Working with more complex structures that have already been set up by the design team (for example, accordions, templates, math blocks, code blocks)
Advanced editors must still follow the documented workflows. Most Drupal components include accessibility requirements or structural rules that can be broken unintentionally without the right guidance.
What Advanced Editors Should Not Do
Even with elevated permissions, advanced editors should not:
- Create new components
- Add styles and classes to the HTML
- Change theme styling, layout, spacing, or colors
- Modify CSS, scripts, or unapproved HTML
- Reuse copied HTML or old snippets not generated by Drupal
- Attempt unsupported workarounds when a documented method does not exist
If something is not documented or has not already been discussed with a designer, please reach out before taking action. The design team is always happy to create the code or components you need so they are accessible and responsive.